How JavaScript Makes Decisions: Understanding Control Flow

Ever stuck in a decision of whether to go out in the rainy season? It doesn't happen that you always reject the option of going out in the rainy season, or always make the decision of going out in the rainy season. You always have some predetermined conditions in your mind, like whether it is too cloudy or whether the weather forecast predicts rain. You always analyse these conditions and take a decision based on the analysis of the conditions.
What if I tell you this is the same principal developers follow while developing something. Their code control always demands some analysis of some conditions. Each codebase has thousands of decision structures inside them. Upon analysing the conditions in the decision structures the control of the code decides whether to go in 1st block or the 2nd block.
In this article, we will look at many ways of structuring our decisions, and upon analysing those conditions, JavaScript decides which code logic should execute.
Control flow determines the order in which instructions are executed in a program. It allows programs to make decisions and run different code depending on conditions.
Lets explore each control flow statement used in JavaScript.
The if Statement
This is the most fundamental control flow statement.
Real-world Analogy - Can a person vote? Yes, if he is 18 years of age or older.
This is the simplest explanation that if statement can have.
Syntax:
if(condition) {
// Execute if condition is true
}
Example:
// Case 1: Condition is fulfilled

let age = 20;

if(age >= 18) {
    console.log('Yes the person can vote')
}

console.log('The decision is already made')

// Result
// Yes the person can vote
// The decision is already made

// Case 1: Condition is not fulfilled

let age = 16;

if(age >= 18) {
    console.log('Yes the person can vote')
}

console.log('The decision is already made')

// Result
// The decision is already made
How the logic flows
The if-else Statement
In this statement, we add an extra step when we want to do something if the condition fails.
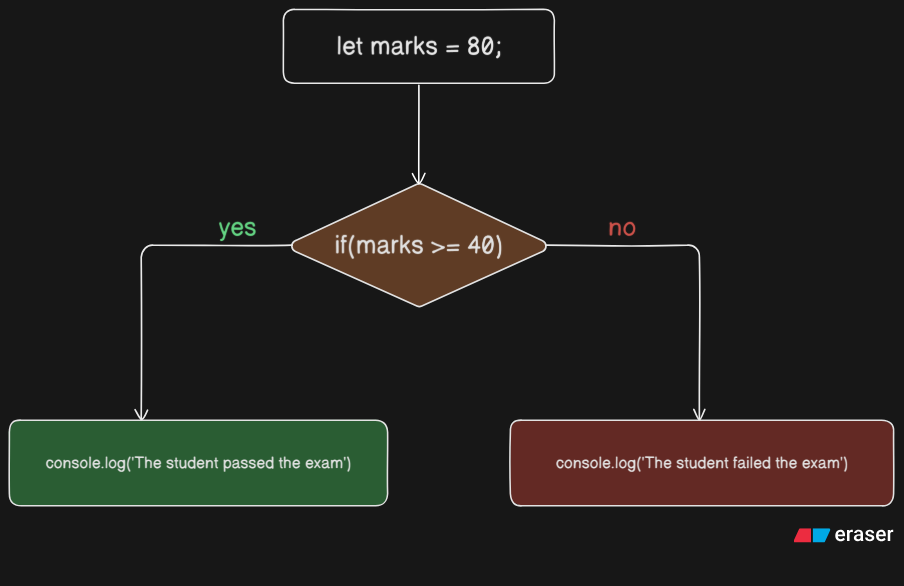
Real-world Analogy - A student's score will determine his pass status. If marks are greater than 40, then the student passes; otherwise fail.
Syntax:
if(condition) {
// Execute if condition is true
} else {
// Execute if condition is false
}
Example:
// Case 1: Condition is fulfilled

let marks = 80;

if(marks >= 40) {
    console.log('The student passed the exam')
} else {
    console.log('The student failed the exam')
}

// Result
// The student passed the exam


// Case 2: Condition is not fulfilled

let marks = 39;

if(marks >= 40) {
    console.log('The student passed the exam')
} else {
    console.log('The student failed the exam')
}

// Result
// The student failed the exam
How the logic flows
The else if Ladder
In this statement, we create a ladder that keeps on looking for a condition, and if any condition passes, execute that and exit the else if ladder.
Real-world Analogy - A student's score will determine his grade. If marks are greater than or equal to 90, then the student will get an 'Excellent' grade, if less than 90 and above 40, then the student will get a 'Average' grade, and finally, if he doesn't fall in any of these conditions, then he gets a 'Bad' grade.
Syntax:
if ( condition 1 ) {
// Execute if condition 1 is true
} else if ( condition 2 ) {
// Execute if condition 2 is true
} else {
// Execute if every condition is false
}
Example:
// Case 1: Condition 1 is fulfilled

let marks = 95;

if (marks >= 90) {
   console.log("Grade Excellent");
} else if (marks >= 40) {
   console.log("Grade Average");
} else {
   console.log("Grade Bad");
}

// Result
// Grade Excellent


// Case 2: Condition 2 is fulfilled

let marks = 55;

if (marks >= 90) {
   console.log("Grade Excellent");
} else if (marks >= 40) {
   console.log("Grade Average");
} else {
   console.log("Grade Bad");
}

// Result
// Grade Average


// Case 3: Every condition fails

let marks = 25;

if (marks >= 90) {
   console.log("Grade Excellent");
} else if (marks >= 40) {
   console.log("Grade Average");
} else {
   console.log("Grade Bad");
}

// Result
// Grade Bad
*Note - You might think in case 1, why did the control not go in condition 2 block even though it is also true. So let me tell you that the conditions are checked from top to bottom, or you can say that from if to else. So if any condition gets true, then it is automatically executed.
How the logic flows
The switch Statement
In this statement, we check for fixed values of a variable. Comparisons are not recommended in a switch. For comparisions else if ladder is preferred since it is more readable and more verbose.
Real-world Analogy - A website has a role field that determines the level of permission the user gets. If the role is 'admin', give him full access; if the role is 'user', give him limited access, and suppose the user is logged in as guest, then he will not get any access.
Syntax:
switch(expression) {
   case value1:
      // code if first case gets fulfilled
      break;

   case value2:
      // code if second case gets fulfilled
      break;

   default:
      // code if every case gets rejected
}
Example:
// Case 1: Condition 1 is fulfilled

let role = "admin";

switch(role) {
   case "admin":
      console.log("You have full access.");
      break;

   case "user":
      console.log("You have limited access.");
      break;

   default:
      console.log("Role not recognized.");
}

// Result
// You have full access.


// Case 2: Condition 2 is fulfilled

let role = "user";

switch(role) {
   case "admin":
      console.log("You have full access.");
      break;

   case "user":
      console.log("You have limited access.");
      break;

   default:
      console.log("Role not recognized.");
}

// Result
// You have limited access.


// Case 3: Every condition fails

let role = "guest";

switch(role) {
   case "admin":
      console.log("You have full access.");
      break;

   case "user":
      console.log("You have limited access.");
      break;

   default:
      console.log("Role not recognized.");
}


// Result
// Role not recognized.
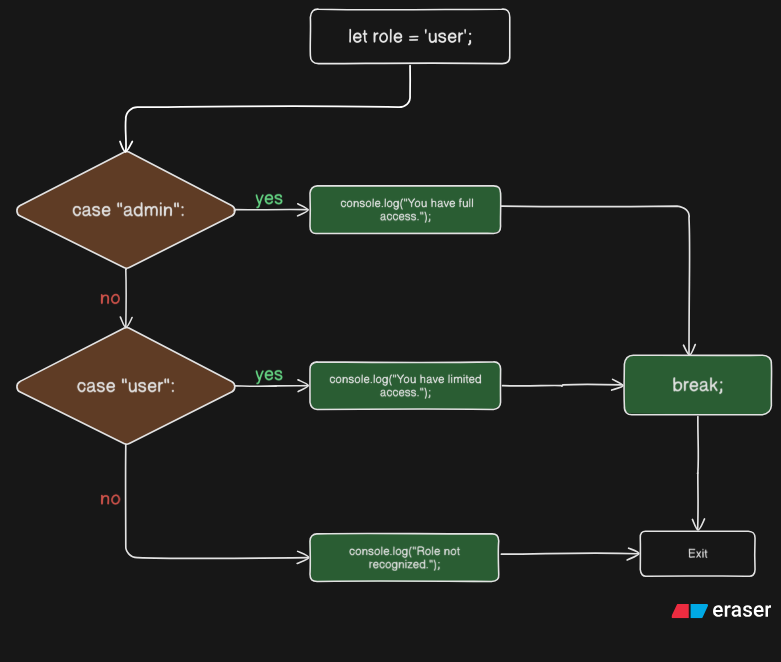
break statement
This statement is a jump statement that skips the rest of the logic in the current scope.
This makes the control of the code jump out of the looping statements without executing further iterations.
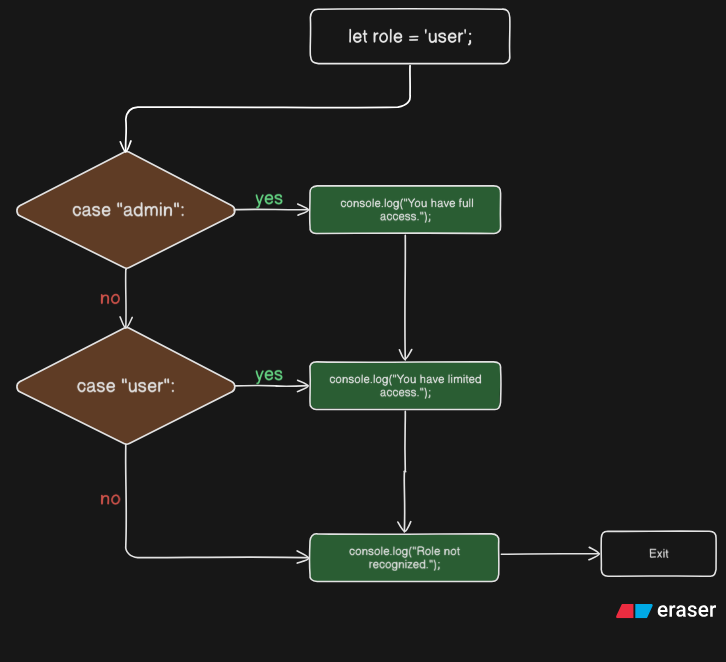
// Case 1: Break is not present

let role = "user";

switch(role) {
   case "admin":
      console.log("You have full access.");

   case "user":
      console.log("You have limited access.");

   default:
      console.log("Role not recognized.");
}

// Result
// You have limited access.
// Role not recognized.


// Case 2: Break is present

let role = "user";

switch(role) {
   case "admin":
      console.log("You have full access.");
      break;

   case "user":
      console.log("You have limited access.");
      break;  // prevents fall-through

   default:
      console.log("Role not recognized.");
}

// Result
// You have limited access.
Fall-Through means that further conditions will also get executed even if they are false.
How the logic flows
With break
Without Break
switch vs if-else
Many developers in their initial journey face a dilemma of when to use what. Let me clarify that
If there are no fixed values, then use
else-ifstatement.If there are fixed values, then use
Switchstatement.
| Feature | if-else | switch |
|---|---|---|
| Best for | Range conditions | Fixed values |
| Example | marks > 40 |
role = 'admin' |
| Readability | Good for complex conditions | Cleaner for many values |
Assignment
We have seen all the ways to handle control statements. Now I will give you 2 assignments which will help you in implementing the knowledge you have received in this article.
Below, I will mention the problems and the solutions so that you can easily refer to them and try to understand how we do it.
Problem 1
Write a program that checks if a number is:
Positive
Negative
Zero
Hint:
Use if-else-if ladder
Problem 2
Write a program that prints the day of the week based on a number from 1-7; otherwise, print 'Your input is not valid'.
Example input: 1
Example output: Sunday
Hint:
Use switch statement
Solution 1
let n = 3;

if(n>0) console.log('This number is greater than 0');
else if(n===0) console.log('This number is equal to 0');
else console.log('This number is less than 0');

// Result => This number is greater than 0
Solution 2
let dayNumber = 3

switch (dayNumber) {
    case 1:
      console.log("Sunday");
      break;
    case 2:
      console.log("Monday");
      break;
    case 3:
      console.log("Tuesday");
      break;
    case 4:
      console.log("Wednesday");
      break;
    case 5:
      console.log("Thursday");
      break;
    case 6:
      console.log("Friday");
      break;
    case 7:
      console.log("Saturday");
      break;
    default:
      console.log("Your input is not valid");
 }

// Result => Wednesday
Conclusion
Control flow statements allow programs to make decisions and run different code based on conditions. Understanding if, if-else, else if, and switch is essential for writing logical and dynamic programs.
Hope this article helped you in understanding control flow.
For more such articles, follow me right here on Hashnode. Let's keep decoding JavaScript together!
